GitHub - ChoDuckHwan/ProjectGO: Individual Practice Project
Individual Practice Project. Contribute to ChoDuckHwan/ProjectGO development by creating an account on GitHub.
github.com
A* 알고리즘을 이용하여 언리얼 엔진에서 캐릭터 이동을 구현해 보려 한다.
개발하면서 문제가 발생하거나, 모자란 부분이 있으면 지속적으로 업데이트하여 PathFinding을 더 발전시켜 보자.
프로젝트는 TopDown(내려보기)로 생성 했다.
레벨에 Grid를 생성하여 A Star 알고리즘을 사용할 수 있는 환경을 만들어야 한다.
일단 2개의 액터를 추가했다.
1.PathFindVolume
이 액터는 레벨에 배치된 그리드들의 생성, 수정을 담당한다.
2. PathFindGrid
레벨에 순차적으로 배치되는 그리드로, 위치와 해당 그리드를 통과하여 이동할 수 있는지에 대한 정보를 갖고 있다.
먼저 PathFindGrid를 생성한다.
아래는 PathFindGrid의 헤더 파일이고 함수 대부분이 Get/Set이기 때문에 구현부는 생략했다.
//APathFindGrid.h
class UBoxComponent;

USTRUCT(Blueprintable)
struct FPathFinGridInfo
{
	GENERATED_BODY()
protected:
	UPROPERTY(EditAnywhere, BlueprintReadWrite)
	int32 row = 0;

	UPROPERTY(EditAnywhere, BlueprintReadWrite)
	int32 col = 0;

	UPROPERTY(EditAnywhere, BlueprintReadWrite)
	bool bCanMove = true;

	UPROPERTY(EditAnywhere, BlueprintReadWrite)
	FVector2D WorldLocation{0.f, 0.f};

public:
	void SetRow(const int32& Row);
	void SetCow(const int32& Col);
	void SetWorldLocation(const FVector2D& Location);

	const int32& GetRow() const;
	const int32& GetCol() const;
	const bool& GetCanMove() const;
	const FVector2D& GetWorldLocation() const;
};

UCLASS()
class PROJECTGO_API APathFindGrid : public AActor
{
	GENERATED_BODY()

private:


protected:
	UPROPERTY(EditAnywhere, BlueprintReadOnly)
	FPathFinGridInfo GridInfo;

public:
	APathFindGrid(const FObjectInitializer& ObjectInitializer);

	const bool& GetCanMove() const;

	UFUNCTION(BlueprintCallable)
	void SetGridInfo(const FPathFinGridInfo& NewGridInfo);

	UFUNCTION(BlueprintCallable)
	const FPathFinGridInfo& GetGridInfo() const;
};
두 번째로 PathFindVolume 액터를 생성한다.
//APathFinderVolume.h

class  APathFindGrid;

UCLASS()
class PROJECTGO_API APathFinderVolume : public AActor
{
	GENERATED_BODY()

public:
	APathFinderVolume();

protected:
	virtual void BeginPlay() override;

public:
	virtual void Tick(float DeltaTime) override;


	UPROPERTY(EditAnywhere, BlueprintReadOnly, Category = Grid)
	FVector2D MapSize;

	UPROPERTY(EditAnywhere, BlueprintReadOnly, Category = Grid)
	FVector2D GridSize;

private:
	UPROPERTY(EditAnywhere, BlueprintReadOnly, Category = Grid, meta = (AllowPrivateAccess = "true"))
	TArray<APathFindGrid*> GridArray;

public:
	UFUNCTION(BlueprintCallable)
	const TArray<APathFindGrid*> GetGridArray();

	UFUNCTION(BlueprintCallable)
	int32 GetGridArrayIndexByLocation(const FVector2D& Location) const;
};
//APathFinderVolume.cpp
const TArray<APathFindGrid*> APathFinderVolume::GetGridArray()
{
	return GridArray;
}

int32 APathFinderVolume::GetGridArrayIndexByLocation(const FVector2D& Location) const
{
	int X_index = Location.X / (GridSize.X * 2);
	int Y_index = Location.Y / (GridSize.Y * 2);
	int Count_col = MapSize.X / GridSize.X;

	int Index = Count_col * Y_index + X_index;
	return Index;
}
GetGridArrayIndexByLocation함수는 위치 좌표가 주어졌을 때 그에 해당하는 Grid의 인덱스 값을 반환하는 함수이다.
언리얼 C++에서 2차원 배열이 안되기 때문에 2차원 배열을 1차원 배열로 나타내는 방식으로 사용했다.
레벨의 X축 Y축 Grid의 배치에 따라 위의 계산값이 바뀔 수 있다.
1. BP_PathFindVolume
그리드 생성에 필요한 액터 파일을 생성했으니, 언리얼 에디터로 돌아가서 PathFindVolume 블루프린트를 먼저 생성하고, 레벨의 중앙에 배치한다.
MapSize와 GridSize를 세팅한다.
MapSize를 3200X3200, GridSize를 50X50으로 했더니 4096개의 Grid가 생성 됐다.
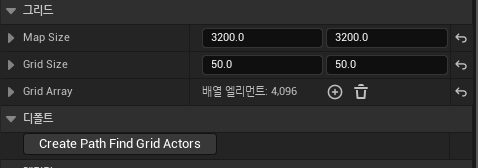
Grid를 생성할 이벤트를 추가하고, 에디터에서 호출을 체크해 둔다.
위의 그림과 같이 CreatePathFindGridActors함수가 버튼 형식으로 나타나고, 이 버튼을 누르면 수행되는 구현로직을 아래와 같이 작성하면 레벨에 바둑판 형식으로 PathFindGrid들이 배치된다.
Y축을 Row로 잡고 X축을 Col로 설정했다.

구현이 다 완성되면, CreatePathFindGridActors버튼을 눌러 Grid를 생성한다.
2. BP_PathFindGrid
이제 PathFindGrid 블루프린트를 생성하고, 아래와 같이 만들어 준다.
레벨이 시작될 때 각 그리드에서 위쪽으로 LineTrace를 쏴서 지형지물이 겹치는지 판단 한 다음, CanMove값을 설정하여 캐릭터가 통과할 수 있는 Grid인지를 먼저 저장한다.

일단 기본적인 세팅은 됐지만 맵 사이즈가 커질수록 Grid들이 엄청나게 늘어나는 것이 성능에 영향을 많이 미칠 것 같다. 이 부분을 다른 방법으로 개선하는 방법도 계속 생각하며 발전시킬 필요가 있는 것 같다.
다음 포스팅에는 본격적인 A Star 알고리즘을 구현해 보자.
'UnrealEngine > PathFinding' 카테고리의 다른 글
| UE5 A*(Star) 알고리즘을 이용하여 PathFinding 만들기(5) (6) | 2024.03.12 |
|---|---|
| UE5 A*(Star) 알고리즘을 이용하여 PathFinding 만들기(4) (0) | 2024.01.22 |
| UE5 A*(Star) 알고리즘을 이용하여 PathFinding 만들기(3) (0) | 2024.01.18 |
| UE5 A*(Star) 알고리즘을 이용하여 PathFinding 만들기(2) (0) | 2024.01.17 |